Tuesday, June 14, 2016

My First Mini Album

I wanted to share with you today a special project that I put together in two short days, not even full days, just half ones. My first ever mini album!

Manny and I celebrated our first wedding anniversary the other week and when it came to giving him a gift, I wanted it to be something from the heart and treasured.

The traditional gift on your first wedding anniversary is paper, so I thought I would put together a quick little album celebrating the first seven years of our lives together. The idea came to me just a couple of days before our anniversary, so I wasn't sure if I would be able to pull it off. Amazingly, I did!

So I took this from my stash (which has been in there for forever):
There are a total of 16 pages if you count the front and back. As I had quite a few photos to include, I decided to use it all. Which in the end, resulted in the album not fitting back in the tin and I am ok with that. I just tied a ribbon around it to hold it all together.
Printed some of my favorite photos (after turning them black and white) that represented our first seven years together on my Instax printer (used all but 2):
Then pulled a bunch of supplies from my stash:
Which included:
  • Two 6x6 paper pads that would coordinate well together color wise (Basic Grey "J'Adore" and Shimelle's from her first collection)
  • A few sets of alpha stickers (October Afternoon, Elle's Studio, Ali Edwards, Kelly Purkey, Tim Holtz)
  • Coordinating sticker sheets and chipboard embellishments from Basic Grey "J'Adore" collection
  • Martha Stewart mini doilies, washi tape (black with white dots), enamel dots from Doodlebug, Shimelle's Roller Date Stamp
  • Phrase roller stamps from October Afternoon and Amy Tangerine
  • Dies from Spellbinders, Die-namics and Momenta
Since I didn't give myself much time to complete this, I wanted to limit the supplies I had to use and to repeat at least one element throughout the mini album to bring cohesion to it. I chose the washi tape and the date stamp to be my repeated elements.

When I sat down to put the album together, I was quite nervous. I wasn't sure if I could finish, wasn't sure if it would look nice, wasn't sure of the size, just wasn't sure about a lot of things.

However, when all was said and done, I was in love with it. I couldn't stop flipping through the pages and just being amazed I did it!

Here is what it looked like:
The icing on the cake was when I gave it to him, he smiled and made little comments about the memories for each of the photos.
After completing my first mini album, I've decided that I must make more! It was so much fun to create once I got over my nervousness.

The best tip I have about making a mini album is this...Keep It Simple!

By minimizing my supplies, printing all my photos in black and white and repeating one or two elements across each page, really helped in putting this album together quickly!

Thursday, June 2, 2016

Mr. & Mrs.

With our 1 Year Wedding Anniversary being today, I thought it would be nice to share with you a layout of one of my favorite wedding photos.

In all honesty I started this layout about 3 weeks ago, but really struggled with putting it all together. When I sat down on Saturday to give it a go at finishing, I realized what my issue had been.

I wanted the first layout I did with our pictures to be just as magical and perfect as I felt it was that day.

When I decided to let the pressure go, everything seemed to fall into place.
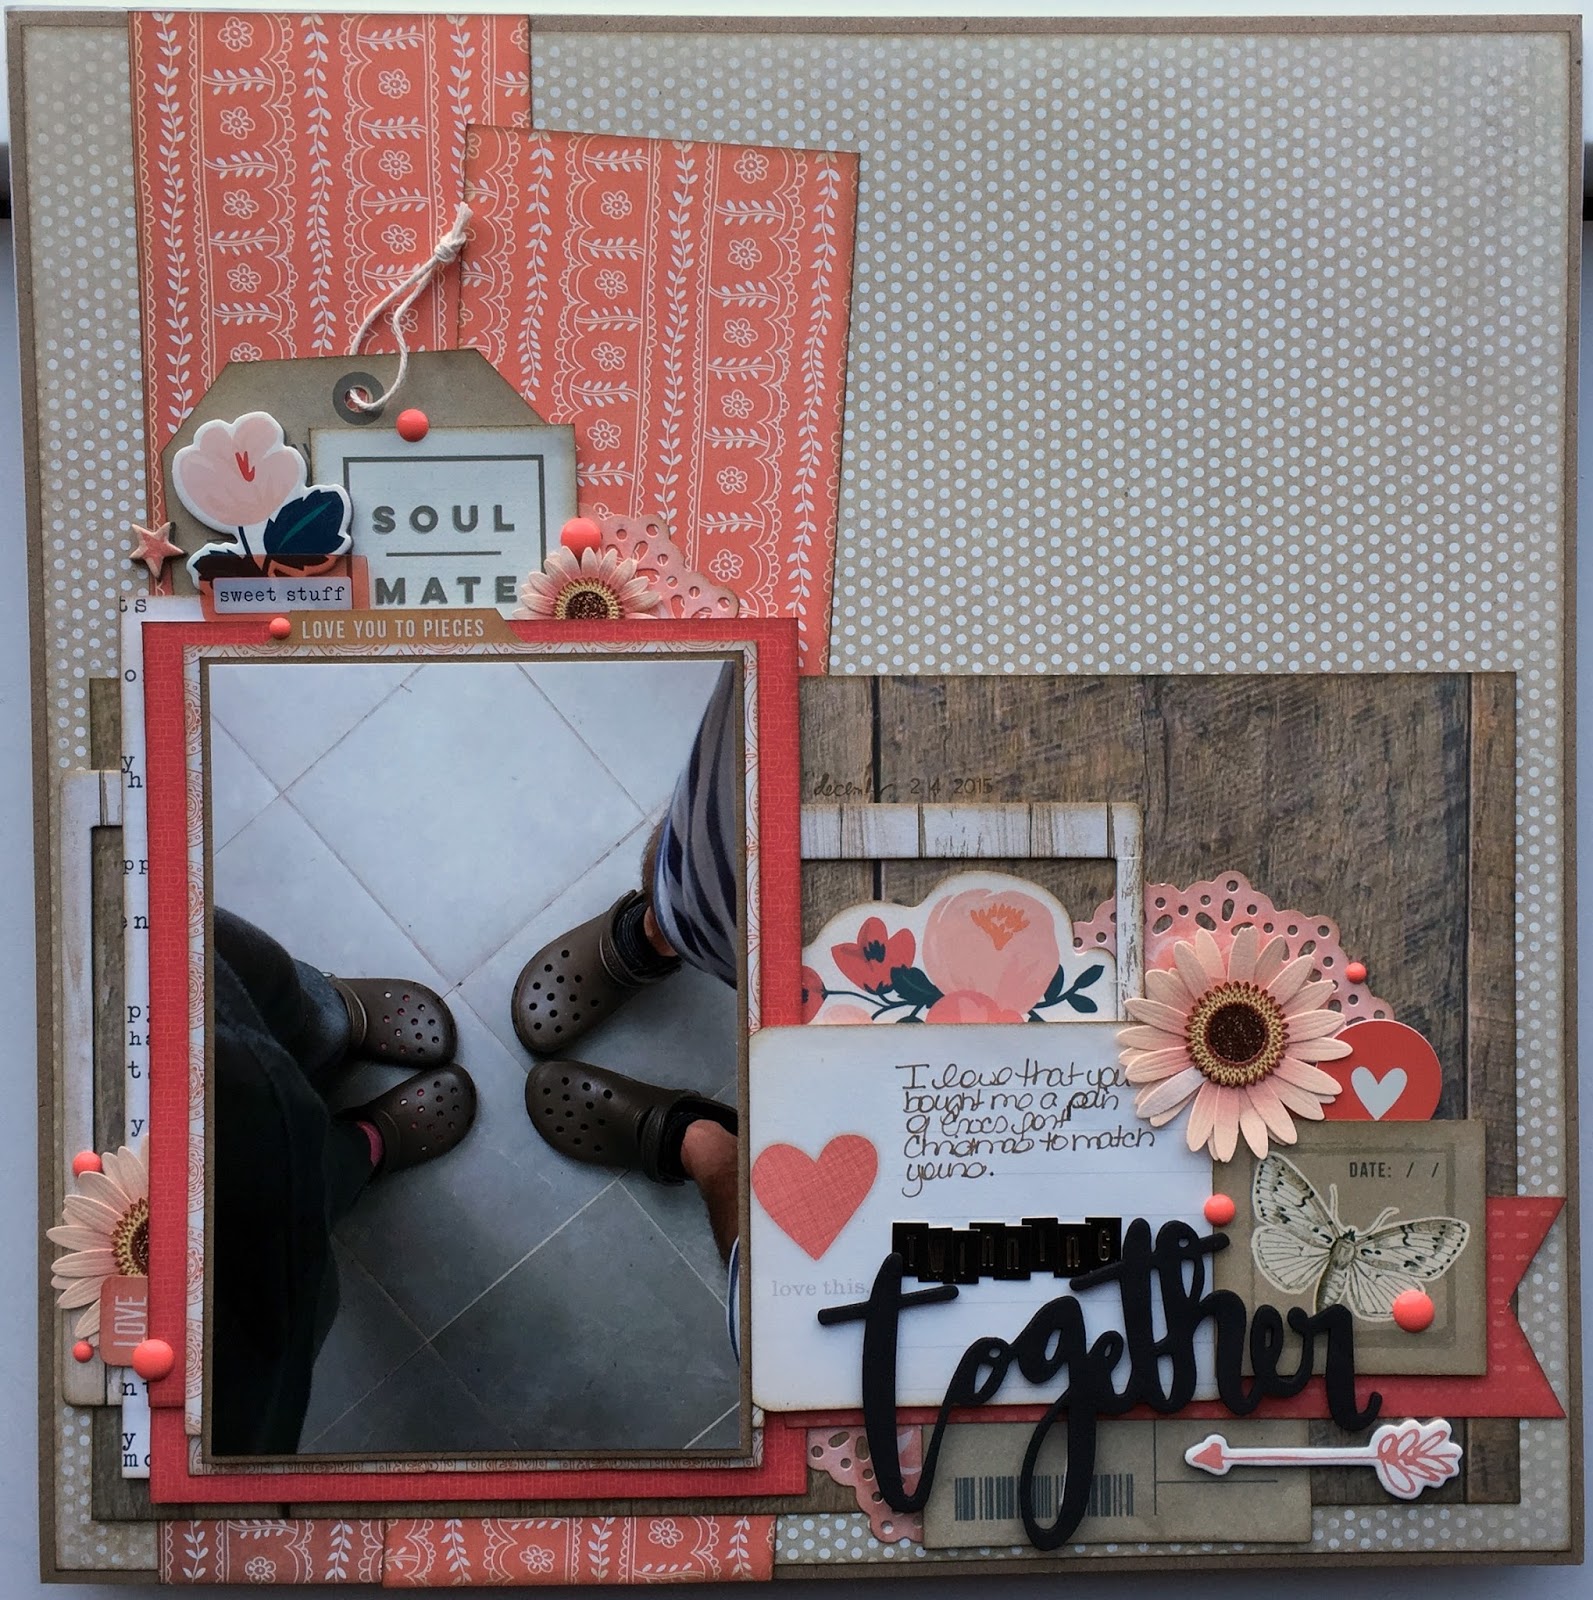
I utilized two paper collections to create this layout. It includes 2 patterned papers from Pink Paislee's "C'est La Vie" collection and one from Felicity Jane's "Chloe" April kit. I used a piece of chocolate brown Bazill cardstock to frame the layout and also as a layer in the middle of the layout.

I went with a diagonal design to bring your eye down the page and opted to put my title along the left hand side to bring your eyes back across the page.
I love how this top little cluster came together. I used some leftover Pink Paislee paper to punch out hearts in two different sizes. I thought they looked nice clustered with the gold glitter heart die cut piece and XO tag from Maggie Holmes' "Bloom" ephemera pack. I received the tiny pink puffy hearts from my sister and the gold gems I bought in Michael's the other week.
I'm very happy how my main cluster turned out as I really struggled with how I wanted everything to be placed. Everything had moved from one side of the page to the other several times, before I settled on this design.
I used a Project Life card from Heidi Swapp for my journaling spot. However, instead of handwriting my journaling, I decided to use those wonderful Maggie Holmes tiny word stickers that came out in her "Confetti" collection. I also managed to finally use one of the gold Maggie Holmes doilies. You can see a small portion of it in the above photo. I also cut it in half so I could use it elsewhere on the page.
Shortly after we got married I had purchased a package of wedding themed wood veneers. I absolutely loved the road sign piece. I decided it needed to be painted white in order to go with the page better, especially since I wasn't adding any additional wood veneer pieces to the layout.

I layered it on top of a Becky Higgins Project Life 4x6 photo overlay from the "Desktop" collection. I like how the "You + Me" is nestled right under the sign. I included another die cut piece and paper flowers from Martha Stewart (so sad Michael's doesn't carry her line anymore). I punched a few more hearts, added more puffy hearts and gold gems to complete the grouping.
To finish the page, I added my title along the left side of my photo going vertically. Here you can see the other piece of the gold doily under my title. I finished this off by adding one more paper flower and three more small gems. I used "Imprint" gold foiled Thickers for my title.
Finally, as for my paper layers for the photo, I simply cut a small border in white paper, then another in a pink Bazill cardstock to add a small frame around my photo. I then took a 12x12 piece of vellum and tore it in rectangles using my Tim Holtz ruler and folded and layered them under the photo. I love how it helps you focus on the photo in the layout.

I simply can't believe how fast our first year of marriage has flown by. We've been together for a total of seven years today, and it feels just as amazing as it did when we had our first date. Here's to my hubby who constantly keeps me on my toes, brings me to uncontrollable laughing fits, loves unconditionally, is my rock and is a wonderful daddy to our new fur baby. I love him more than I ever thought was possible.

I hope you enjoyed my layout celebrating our marriage. Now that this first one is complete, I am hoping to get more of our amazing pictures in our album.

Thanks for looking and I hope you all have a wonderful day!

Friday, May 27, 2016

Life Update

So much has happened in my life since my last post on Thursday, March 17th. Where do I begin?

My husband received some of the worst news ever in the very early morning hours on Saturday, March 19th. His father had unexpectedly passed away. It rocked our world. We were in utter disbelief. Life for the next two days became a whirlwind of plans to head to Greece.

The one week my husband was gone, was one of the longest weeks of my life. I unfortunately couldn't travel with him for medical reasons, so being apart during this time was so difficult. It didn't help that we were now in two different countries and several times zones away, made it even more hard for me as all I wanted to do was be with him to support and comfort him.

Less than two and half weeks after he came back from Greece on Tuesday, April 12th, I heard from my mother that my father had been rushed to the hospital after collapsing in the yard. I couldn't believe it. So close to my father-in-laws passing, I didn't want to think I could lose my own father.

It turned out my father had developed blood clots in both legs and in both lungs. I had never been so worried. I ended up getting on a plane that Saturday and surprised him in the hospital. The look of surprise and him holding my hand while I sat next to him, made the trip worth it to me.

Fortunately, after him being in the ICU for almost 5 days, and down graded from critical care for a day and a half, the day after I arrived we were able to take him home. As of today, he has had his medical follow-up appointments and is doing really well.

The rest of April was all about getting life back to normal.

On Saturday, May 7th Manny and I expanded our family. We decided to adopt our kitty Shana!
The idea of getting a cat had be milling in our minds since last Fall. We just hadn't really pursued it until May. We ended up heading out to North Shore Animal League to see if we would find our new family member and after looking at all the kitties, we decided that Shana belonged in our lives.
As of tomorrow, it will have been three weeks since we adopted her and let me tell you, she brings so much life, love and joy to us.
She is truly like a puppy. She needs to be played with in the morning and the evening. She will bring you her toys to play with her. She follows us around the house and always wants to be in the same room as us. When she lies down next to you, she always has to be touching you. Many times when you go up to her, she will give you her paw to hold.

And boy does she like to stretch!!!
So that pretty much brings you all up to date. I am still scrapbooking. I haven't touched my knitting needles since December though. With this long holiday weekend, I am planning on changing that. I have a pair of socks that desperately need to be finished. We are heading to a family BBQ in CT on Sunday, so I will take advantage of the car ride to getting some knitting done.

I hope you all have a wonderful, safe and not too hot Memorial Day weekend! The temps here have been in the high 80s, low 90s, so I'd say it feels like summer has arrived.

Thursday, March 17, 2016

Twinning Together

Christmas is long gone, but I am still reminiscing and scrapbooking those photos. We aren't even going to talk about how I am still working on my Christmas Journal. We'll save that for another day.

Today we will focus on one of my favorite photos from exchanging Christmas gifts with my hubby.
Several months ago we had bought him a pair of Crocs to wear around the house. While these things may not be fashionably attractive, they are super comfortable! I had wanted a pair also, but the store didn't have any in my size. No biggie. I could always get a pair online. Which I never did.

While I may have forgotten about the Crocs I had wanted, my hubby did not. He gifted me with a pair that were exactly like his at Christmas.

The simplest gift like this put a huge smile on my face and I couldn't resist snapping a picture of us wearing our matching Crocs!

For this layout I used  a couple of Crate Paper off cuts I had left in my stash (oh how I love that wood grain paper) along with several papers from Basic Grey's "Dear Heart" collection. I am so sad Basic Grey is leaving the scrapbooking business and I may, or may not, have added one too many papers from this collection into my stash when I heard the news.
I included three embellishment clusters as per my usual design. Each varying in size.
I pulled items from other collections that contained the orange/peach color that I felt coordinated with the Dear Heart papers I chose to use. The chipboard and ephemera pieces came from Crate Paper's Wonder collection. The clear "Sweet Stuff" tab was found in Maggie Holmes' Shine ephemera pack.
The paper flowers are from Martha Stewart.
The sticker doily came from My Mind's Eye "Sweetest Thing" sticker sheet. The Project Life card I used for my journaling was from Amy Tangerine's "Ready Set Go" mini kit. I even used the plastic heart clip (tucked next to a paper flower above) from the Simple Stories "I Am" collection.
This was the first time I had been able to find so many elements from different manufacturer's that would coordinate together effortlessly and I love the final outcome!

Thursday, March 10, 2016

Man vs. the Machines

On two separate weekends in June of last year, I caught my husband doing something that reminded me of a young boy being totally fascinated. First, I spotted him staring into the washing machine and then one week later, it was him staring into the dryer. It completely warmed my heart and was thankful I had my phone on hand to snap the photos without him knowing!

While I found myself in a super scrappy mood, I decided it was time to get these pictures on a layout. I dug into my stash and decided to use several papers from Amy Tangerine's "Stitched" collection. Here is the final product:
I was completely drawn to the heart paper to be my background right away. I loved the random yellow hearts. From there, I decided that I would accent the layout with grey, yellow and orange from the collection.

For my clustering, I wanted to create three clusters directly around the photo to get the visual triangle and help bring your eyes to the photos, since the background was quite busy. I then knew I needed to bring elements (colors and texture) from the body of the layout to the upper top right hand corner. Someplace for your eyes to start on the page and naturally flow down and around it.
I knew I wanted man and machine in my title, to be different fonts, but both to be Thickers. I chose Eclair and Kal Barteski. The remainder of the title is Tim Holtz's tiny letter tiles.
Right after I chose my papers for this layout, I knew this double heart cut apart had to be included somewhere on my layout. I loved the stitched hearts and the bright orange color. However, by doing this I knew I would be losing my journaling spot.
Then the bright idea came to me to do hidden journaling! I took a premade tag from my stash and adhered it to the grey patterned paper I used in matting my photo on both sides of the tag. The reinforcer for the tag was cut from my Tim Holtz tag Thinlet die set.
There wasn't much space for embellishments on the lower right corner. I kept it very simple with just a few elements consistent with the rest of the page.
In the beginning I wasn't sure where exactly I was going with this layout. In the end, I love how it all came together and most importantly, another story has been told!

Friday, February 19, 2016

5 Days

When I received a very modest package filled with a some of my favorite pieces from a few of the new scrapbooking releases, I couldn't wait to sit down and create.

I was immediately drawn to all the pretty papers from Shimelle's Starshine Collection. I think what I love most about her new collection is all the gorgeous pink and coral toned papers!

After choosing the perfect picture, I set out to select my papers. I used three papers from the Starshine Collection, one from Maggie Holmes Bloom Collection, and an old one from October Afternoon Girl Talk Collection.
When I first started to plan my page I knew I wanted to use the gorgeous floral paper from Starshine as my background, the text paper from Bloom as a layer and black cardstock to mount my page and mat my picture.

From there, I selected two more patterned papers to go with my large layers and one cut apart paper from Starshine to use as embellishments.
For my main cluster I chose a few of my favorite phrases/words from the cut apart sheet. I liked them not only for what they said, but their color too. I also cut a 3x4 card from the yellow October Afternoon paper to house my journaling.

Some items from my stash also made it on to the page: chipboard floral from Crate Paper Craft Market, gold foiled heart die cuts from We R Memory Keepers Crush, and a Valentine's tag from Crate Paper Kiss Kiss.
My layers are sitting on top of two manufacturing strips from the Starshine papers that brought in more of the floral and navy blue found in the collection. The coral striped paper is from the cut apart paper. Oh how I loved using all those cut aparts!

After getting all my layers how I wanted them, I decided I needed to add a circular element. In came my scalloped punch to the rescue! It helped give me a place to anchor my title.

For the cluster at the top of the page, I added a couple more phrases from the cut apart paper and layered them on top of the gold heart washi tape, which also made a small appearance in the main cluster.
You can also see I added a couple little snippets of the two manufacturer strips that were also in my main cluster. I found the flair buttons from Starshine so cute and thought it made the perfect circular addition to the cluster. Enamel dots were my finishing touches added to both clusters!

Overall my layout turned out to be quite simple in embellishing. I didn't want to overwhelm the page and take away from my picture and story.

The story behind my picture is quite simple. I wanted to document that just five days earlier we had gotten married at City Hall, and now we were becoming Godparents. It had been quite an exciting week for us. So much to celebrate!

Sunday, February 14, 2016

Fiber Family

I decided to spend our negative degree weather day inside scrapbooking. To me the chilly weather just gave me an excellent excuse to spend time at my craft desk guilt free. A winning situation if you ask me!

I have a serious backlog of untouched scrapbooking kits and one of my goals for this wonderfully long weekend, was to break into one of them.

My kit of choice was November's Clique Kit which featured We R Memory Keepers Wildflower collection. When I first saw this collection I loved it immediately, even though it's not typically my style.

It didn't take me long to choose a picture that I felt went well with the collection. I chose it specifically because of all the wonderful colors displayed in our handknit items we are wearing. The orange, green, blue and pink colors are all found in the papers.
Even though there is a lot going on in this spread, I feel you don't loose focus on the picture itself.

To achieve this, I specifically matted my picture in the same card stock (from my stash) as my page border and placed the picture on top of the gorgeous blue and white patterned paper. I then added a slight mint green border (from my stash) on either side to further breakup the picture from the dark floral background paper.
Even  though this picture was taken in the middle of a Fall October afternoon, I knew I wanted to fussy cut the floral from the "Wildflowers" patterned paper. I dread fussy cutting, simply because I think I'm not very good at it, but the end result always makes me happy I took the time to do it.
For my cluster to the right, I rummaged through my Project Life cards and found this 4x6 card in the "Vintage Travel" collection to be my base.

I knew I wanted to add a little something around the fussy cut flower at the top right of the photo and the Pink Paislee gold frame was perfect.

I included a couple of Martha Stewart floral stickers from my stash to add a different texture to the spread behind the floral die cut. Adding a little gold glitter washi tape, the "Life is an Adventure" flair badge and a few additional die cuts from the collection, helped bring everything together.

For the title, I used a combination of the block alpha letters from the Wildflower sticker sheet included in the kit and Amy Tangerine's foam thickers in Kal Barteski from my stash.

Overall, I am really pleased with how everything came together!